LAB 1 - Temperature Sensor and LCD Screen.
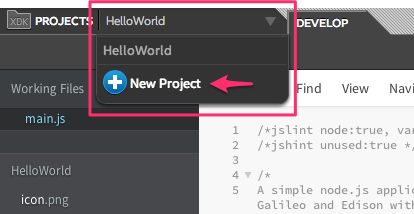
Step 1. Start a new project in the Intel® XDK. Click on the projects drop down menu in the upper left hand corner, then select New Project.
Step 1. Start a new project in the Intel® XDK. Click on the projects drop down menu in the upper left hand corner, then select New Project.
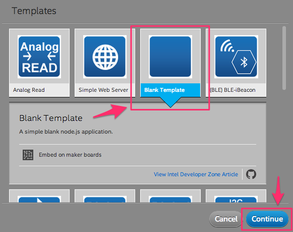
Step 2. Choose Templates and select Blank IoT Node.js Template from the list of templates, then click Continue. Enter the Project Name of your choice and click Create. The Intel® XDK will create and open main.js for you.
Step 3. Type in the following code (if you prefer to copy and paste this code please use the open notepad file within the XDK window):
// Include the JavaScript UPM libraries
var groveSensor = require('jsupm_grove');
var LCD = require("jsupm_i2clcd");
// Create a new instance of a Grove RGB LCD screen
// The Offset is necessary for Firmata
var OFFSET = 512;
// Instantiate the temperature sensor and LCD actuator
var temp = new groveSensor.GroveTemp(1+OFFSET);
// Create a new instance of a Grove Temperature Sensor
var screen = new LCD.Jhd1313m1(0+OFFSET, 0x3E, 0x62);
// monitor - creates an anonymous function that runs once per second
// The function will get the temperature and display it on the LCD.
function monitor() {
setInterval(
function() {
// Read the temperature sensor
var celsius = Math.round(temp.value() * 0.33);
// Convert it to fahrenheit
var fahrenheit = Math.round(celsius * 9.0 / 5.0 + 32.0);
// Log it to the console window
console.log(celsius + "° Celsius, or " + fahrenheit + "° Fahrenheit");
// Update the LCD screen
screen.setCursor(0, 0);
screen.setColor(0, 0, 0);
screen.write("Temp: " + celsius + "C or " + fahrenheit + "F");
}, 1000);
}
// Call the monitor function once
monitor();
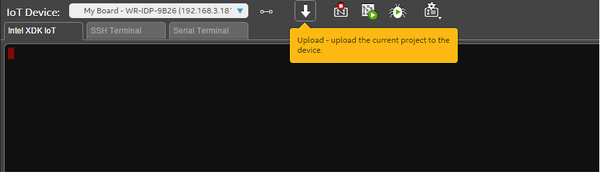
Step 4. In the bottom toolbar, click the "Upload" icon. Wait a moment for the packages to download on the device and install. You will see a confirmation message in the console log.
// Include the JavaScript UPM libraries
var groveSensor = require('jsupm_grove');
var LCD = require("jsupm_i2clcd");
// Create a new instance of a Grove RGB LCD screen
// The Offset is necessary for Firmata
var OFFSET = 512;
// Instantiate the temperature sensor and LCD actuator
var temp = new groveSensor.GroveTemp(1+OFFSET);
// Create a new instance of a Grove Temperature Sensor
var screen = new LCD.Jhd1313m1(0+OFFSET, 0x3E, 0x62);
// monitor - creates an anonymous function that runs once per second
// The function will get the temperature and display it on the LCD.
function monitor() {
setInterval(
function() {
// Read the temperature sensor
var celsius = Math.round(temp.value() * 0.33);
// Convert it to fahrenheit
var fahrenheit = Math.round(celsius * 9.0 / 5.0 + 32.0);
// Log it to the console window
console.log(celsius + "° Celsius, or " + fahrenheit + "° Fahrenheit");
// Update the LCD screen
screen.setCursor(0, 0);
screen.setColor(0, 0, 0);
screen.write("Temp: " + celsius + "C or " + fahrenheit + "F");
}, 1000);
}
// Call the monitor function once
monitor();
Step 4. In the bottom toolbar, click the "Upload" icon. Wait a moment for the packages to download on the device and install. You will see a confirmation message in the console log.
Step 5. In the bottom toolbar, click the "Run" icon to run the project.
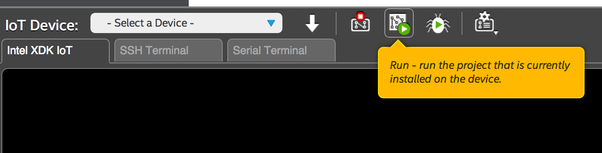
Step 6. If successful, you should see the temperature output in the LCD Screen. This step completes Lab 1.
